About Us

CAtennis is a passionate discussion for serious tennis players, parents and coaches looking for something different. No talk about technique, no talk about useless theory, no gimmicks; just practical advice from first-hand experience on how to improve your tennis. Kick back, drink the content, bounce ideas, and pitch articles (or friend us on Facebook).

Unless otherwise noted, all articles are authored by the founders of CAtennis.  Enjoy!

TennisSlowMoGuy

Entries in Backhand (11)

Wednesday
Oct262011

Why Are You Not Doing This?

The hand to eye coordination needed to play baseball is one of the most demanding in any sport. Players, whether juniors, college or MLB pros, spend hundreds of hours per year in the batting cages to groove their swing and improve their hand to eye coordination in order to find the sweet spot when it matters. Working on the fundamentals - even for players who have mastered the game - is a continuing process. Hitches and kinks in the stroke appear all the time so it's important for the players to go back to the basics in order to correct the motion. 
For some reason, however, American juniors have an aversion to a similar training tool that is available to tennis players: the ball machine. Why is that?! Do you think that because you have a bigger racket head that somehow the ball is easier to hit?! Let's put it this way, the average strike zone for baseball is a mere 500 square inches (basically, that's the width of the home-plate x distance between chest and knees) [yeah, yeah, some baseball players will probably want to debate this...not interested]. In addition, the baseball bat sweet spot is not bigger or smaller than the sweet spot of the tennis racket. In tennis, however, the opponent does not have to hit the ball TO you. The tennis "strike zone" is a whole lot greater: width of tennis court (27 FEET) x length (39 FEET) x height at which contact can be made (e.g., high backhands/forehands, overheads, low slices and drop shots, etc.) (let's say 7 FEET). That's an area of SEVEN THOUSAND THREE HUNDRED AND SEVENTY-ONE CUBIC FEET (7,371ft3). As tennis player, you have to become proficient at hitting the ball FROM anywhere (in your court) TO anywhere (in the opponent's court). Furthermore, the skill necessary to accomplish this task resembles hunting with a spear (or bow and arrow): you have to hit a moving target (prey) with a moving object (weapon) while you yourself are on the run. Same concept applies to tennis: you have to hit a moving object (the ball) with a moving object (racket) while you yourself are in motion (sometimes more, sometimes less)....and you have to hit the court... and maybe keep it away from the opponent. This is not just hand-to-eye coordination - it's hand-to-eye-feet corrdination (and you have to do it over and over again throughout the match). And yet, not many players deem it worthwhile to groove their strokes on the ball machine. Then, they wonder why the shots aren't going in during a match. There's simply no better way hit 2-3000 balls per day than on the ball machine. Done right, this  becomes purposeful practice. So try this:
 

In the diagrams above, the white "X" represents the placement of the ball machine and the yellow circle represents the contact point (more or less). The blue line is the path of the ball FROM the ball machine; the red lines are the paths of the ball FROM you. Instead of setting up the ball machine in the MIDDLE of the court, place it off-center (WAY off-center) and practice changing the direction of the ball. Rather than doing side-to-sides for 7 minutes and then quitting (because you're not used to hitting 300 balls in a row), practice hitting from a set location while keeping "light" feet...learn the "dance" steps immediately preceding the contact; hit and recover (or, like boxing, "stick and move"). Changing the direction of the ball is usually where all the unforced errors in tennis take place. So reduce the likelihood of mistakes by learning how to adjust for every angle. That is, how to hit a cross-court from a down-the-line; down- the-line from a cross-court; or a sharper cross-court from a cross-court. Again, keep your feet moving and groove your strokes (to the point where they're "in your blood"; AUTOMATIC) so that they don't break down under pressure. Supplement your lessons with ball machine training since, it's not only important to learn a good shot (something that lessons are intended to accomplish) but also to FORGET the bad strokes. To use an analogy, tennis is a lot like sculpting a statue: you have to do the hard chiseling and hammering work; the master (tennis pro) is the one who helps you bring out the details with the fine sandpaper...but then it's back to the chiseling and hammering work. This is YOUR project, not your coach's, so make sure that you take ownership of it

Friday
Oct212011

Steal This Drill: The Backhand Game


In honor of my dad's birthday, "MR. G", I present to you "the backhand drill". When learning to play, he always told me that you're only as good as your backhand and second serve. If both or either of those two components break down, it's going to be tough row to hoe. Anyway, the purpose of this drill is to get as much repetition and backhand practice as possible. This is particularly important for juniors who seem to hit forehands day-in and day-out but regard the backhand as a mere after thought. Here's a little tip from an old snake: don't let me catch you with a glaring weakness on your backhand; I don't care how good your forehand may because you're simply never going to hit it (don't even bother warming it up - j/k) or you're only going to hit it from the most awkward positions. I'm not too proud to slice you, dice you, moonball or junk your forehand to get enough of the backhand exposed. So make your backhand rock solid or be prepared to run.

Figure 1: this is a half-court game up to 10, 15, 21, etc. where the players (a) can only hit backhands; (b) the ball can only go cross court unless you go down-the-line drop shot (player chasing the drop shot CAN hit a forehand on that play only). Players cannot hit inside out forehands but can come to the net where they can hit forehand volleys. The point, however, is to stay back and grind with the backhand.

Figure 2: this game is the same as the one in Figure 1 although the players get to use "more court" (i.e., players can hit 2-3 feet in the down-the-line half (deuce side)). The purpose of this drill is to learn how to hit the backhand and recover to the middle (otherwise you get caught with a forehand). This is particularly useful for players who tend to plant themselves 2-3 feet in the backhand side of the court. Anytime you get complacent, a good player is going to take advantage of your positioning so it's always preferable to "stick and move".

Sunday
Oct162011

Steal this Drill: Variations on the Old Two-on-One Drill

Here's a little variation to try when you're doing two-on-ones. Generally, in the 2-on-1 drill, one of the players does all of the hitting and running and it seem like the other players are just barely hitting a shot and then standing around. Sure, the coach can push the players to move their feet but, eventually, the whole concept breaks down when the drill sergeant isn't looking and players are back to standing on their heels.

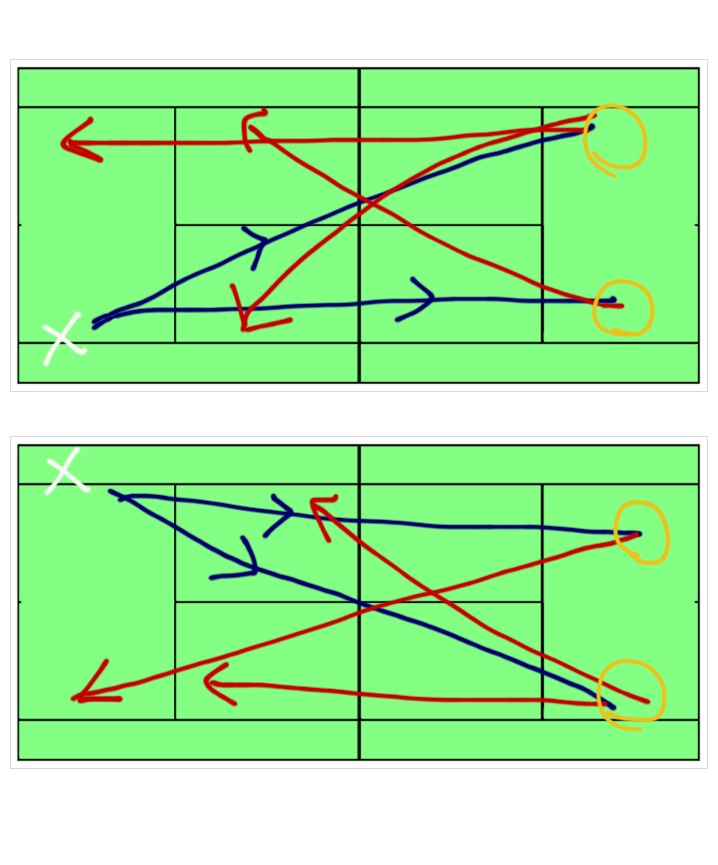
Instead of trying the same-old, same-old and expecting a different result, place two targets (be them wrist-bands, athletic tape, plastic lines, cones, etc) about 6 feet inside the baseline and 4 feet from each side line. The two players hit down the line (or cross-court) and then SPRINT IN AND TOUCH THE TARGET and pedal back (FIG 2 BELOW). In turn, the single player hits the opposite of the two-player team (i.e., cross-court or down-the line) and aims for the same target (so the target serves as both a point for the player to aim to as well as a spot towards which the two players must run to). The key to this drill is that while the single player moves side-to-side, the two players move forward and back so everybody is getting the benefit of running and hitting although in a different direction.

Conversely (FIG 1 BELOW), have the same set-up as above but put one of the two-player team at the net (the other at the baseline). The two-players hit down the line; the single player hits cross court. However, in this variation, the net player hits the volley and backpedals, touches the cone/target and then sprints IN again to make contact with the volley inside the service line. This is an AWESOME way for the players to practice their first volleys. 

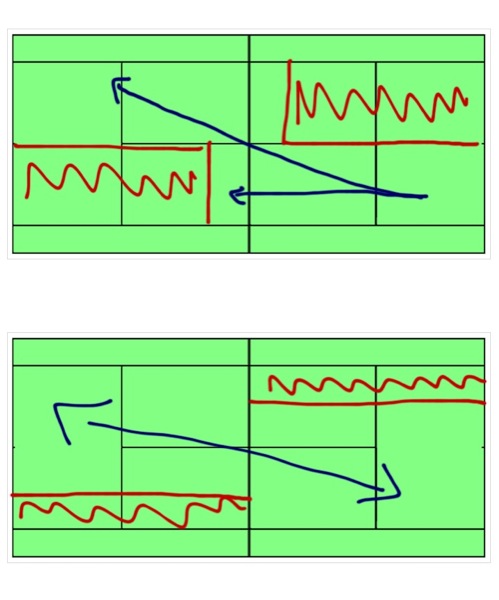
Another variation on the 2-on-1 drill is where the two players do most of the moving. The drill is cross-courts (or down-the-line). The two players line up on one half of the court, one behind the other. A cone is placed about 1 foot (or more) in front of the baseline T or slightly into the other half of the court. The single player (or coach) feeds the ball to one of the two guys. This player hits the ball back and then sprints forward and around the cone. The other player then steps in, hits the next shot, sprints in and rounds the cone. If the players are practicing backhands, the two-player team rounds the cone clockwise. If the players are hitting cross-court forehands, the players are rounding the cone counter-clockwise. Many players have done this drill when the ball was fed to them but there's no reason why it can't be done in a live-ball setting. The key is to focus on control and movement. The same concept can be done down the line and the cone can be moved around. It's an awesome way to develop ball control and RECOVERY.

---

The purposes of the 2-on-1 drill is, obviously, to make sure that the single player (i.e., the "one") learns to both move and move the ball around. In tennis, changing the direction of a moving ball (movement #1), while you are in motion (movement #2) with a moving object - the racket (movement #3) is one of the most critical components to understand and master. However, nothing irks me more as a coach than seeing the 2 players loaf around waiting for their turn to get a workout. Although I agree that the primary purpose of the 2-on-1 is to provide the single player with a good workout, the drill often breaks down because the "two" players' minds wander or their feet stop moving.

Above, we have covered things such as hitting the ball and running in and touching the cone. Again the cone can be inside the baseline (serving, also, as a target for the shots of the "one"), at the center T (thereby teaching the "two" to hit and recover) or anywhere else for that matter (e.g. 10 feet behind the baseline or even at the intersection of the baseline and the singles/doubles sideline). The concept, here, is of course, to keep ALL players hitting and moving and to also keep the minds of the "two" players focused on specific tasks in between strokes. In addition to hit-and-recover drills, the players can also include other devices to maintain the intensity of the work-out. For example, there's nothing stopping the "two" players from doing kangaroo jumps (e.g. 2-3), high knee running in place, split-lunges, squat jumps, etc. in between strokes.

Saturday
Oct152011

Steal this Drill: The "Cross" Drill

The "cross" drill is a variation of the inside-out, side-to-side and advance retreat. In it's purest form, it combines the drills together in that the player is made to move side-to-side, inside-out, and advance retreat. The concept is that that player is being pushed into uncomfortable positions - similar to something that the opponent may throw her way - and have to generate pace and precision accordingly.

In other words, this drill borrows from the muscle-confusion theory of physical workouts (such as P-90X or Insanity) by making the player execute shots when she is not in the optimum location. For example, the player is made to hit a "regular" forehand, followed by an inside-out forehand, followed by a short forehand which is, in turn, followed by a retreating forehand. From then, the player is jerked around from these four points of an imaginary cross while always moving either after the ball or away from the ball. In this drill, the player should imagine that s/he has a Death Star "force-field" around her and that the ball never enters the force-field (thereby jamming the player). The key is for the player to "tell the ball what to do"; not the other way around. For maximum benefit, alternate a the cross drill with a live ball rallying drill where the coach pushes the player gently (at first) around the court making him move backwards, sideways and forwards, and seeing how the player adjusts to the ball and recovers after hitting. The emphasis should be on proper footwork, balance, contact point, intensity as well as hips-shoulder-arm preparation and positioning. 

Saturday
Oct152011

Inside-Outs

There's a misconception that the best way to practice for tennis is to perform solely "standard" side-to-side drills. This is certainly a good drill for learning proper movement to the ball. However, as very few points are in fact played in a "coast-to-coast" fashion (i.e., sideline to sideline), every practice should seek to incorporate an inside-out drill as well (that is, forehand from the backhand side, backhand from the forehand side). Inside outs assist the player in squaring the leading shoulder to the ball (a particular problem with players with extreme open stances) and staying on their toes. It is important to note that in tennis, running TO the ball is as important as running AWAY from the ball. Inside-out teach the player how to properly set up for every shot in order to maximize power, accuracy and positioning. 

Initially, the coach should feed "regular" side to side sets followed by inside out (e.g. sets of ten each). The player's goal should be to maximize power and placement in order to generate the best angle that she can under the circumstances. After the player becomes proficient at the fed drills, the practice can incorporate the "corners" drill where the coach stays in one corner and moves the player around side to side (the player hitting one "regular" shot followed by an inside out shot). For tougher practices, the player can hit ALL inside outs, although this would depend on the coach's fitness and expertise. A great drill is the typical figure 8 drill but where one player has to hit inside outs (cross-court). Similarly, a more basic drill is the "lazy 8s". This is where the players play cross court and HAVE to alternate shots regardless of the bounce (i.e., if the player hits a forehand off the feed, the next one MUST be a backhand). As the name implies, this is a variation of the standard figure 8 drill although the court is smaller and footwork is more focused. This is a also a great warm-up drill as it keeps the feet moving. 

Learn to master the inside-outs (strokes and movement) and your angles will be deadly.